Transcriber, Audacity, and Anki are three programs, all free and open source, that are useful for language study. At some point in the future, I hope to write more on each of these. In the meantime, I wanted to announce two export plugins I created for Transcriber. One export creates a label file for Audacity, for splitting an audio file into individual clips, and the other creates an import file for Anki, associating the transcribed text with the audio segments. Below are step-by-step instructions for the 6 steps involved, starting from a raw audio file and finishing with a set of Anki flashcards.
Step 1
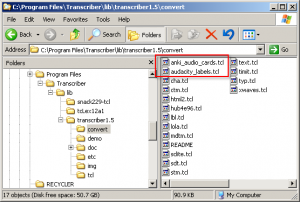
Download the plugin files anki_audio_cards.tcl and audacity_labels.tcl from the zip file or individually, and put them into the lib/transcriber1.5/convert/ subdirectory of the Transcriber program location. If Transcriber is running, you will need to restart it for the plugins to take effect.
Step 2
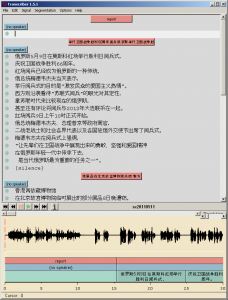
Create an episode project in Transcriber. Split up the audio into turns of 1 sentence or less. Individual turns shouldn’t be too long, as the resulting clips would be sub-optimal for SRS use. The project should have at least one section (e.g., a report section) with a title describing the topic. The topic(s) are carried through to the Anki import, so they can be used as an optional title along with the audio prompt. One of the export fields is the sentence number within each section. If multiple sections are used, the numbering will restart at 1 for each new section.
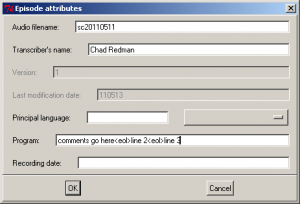
If the episode attribute “Program” is set, this is inserted as a comment at the top of the Anki import file. Multiple lines in this comment can be delimited with the string “<eol>”. While this information doesn’t get imported into Anki, it can be useful for reference purposes if the import file is kept.
Step 3
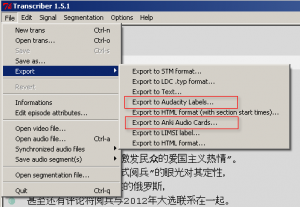
Export the Transcriber project to two files, using both the plugins:
a) File->Export->Export to Anki Audio Cards..
b) File->Export->Export to Audacity Labels…
Step 4
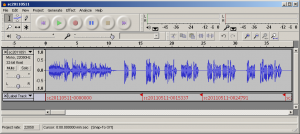
Open the original file in Audacity (Transcriber does not need to be closed). Then, select Project->Import Labels and choose your previously exported labels file (the default file extension is “-labels.txt”). The result should be a new label track with named flags. These flags should be in the same locations as the original Transcriber segments; i.e., the times shouldn’t be cutting the middle of a sentence anywhere. Due to a bug in the time calculation of Transcriber, the splits may gradually drift from the original locations, eventually moving into the non-silent audio itself and cutting it off. The Transcriber export plugins account for that and compensate for it; however, I don’t know at this point if the adjustment factor of 0.995472 is machine-dependent. If you’re adventurous, you can edit the plugin files and change the adjustment factor yourself to correct the problem.
[If you wish, this is a good point to adjust the audio volume, if it’s too low. Select the entire waveform, and choose Effect->Amplify. The maximum amount of increase before clipping occurs is pre-calculated. If it’s still too low, check “Allow clipping” to enable a higher range, at the expense of occasional distortion.]
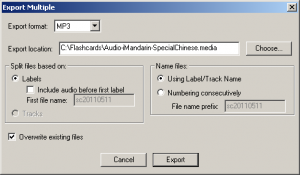
Select File->Export Multiple from the menu. Choose your export format for what you want to use within Anki (e.g., mp3). The Export location can be anywhere, but note that eventually this directory will need to be a subdirectory of your Anki deck, and named <your deck>.media. Split files based on labels, and name files using label/track name.
The result should be a series of small audio files, named with the original Transcriber episode name, appended by a millisecond timestamp.
Step 5
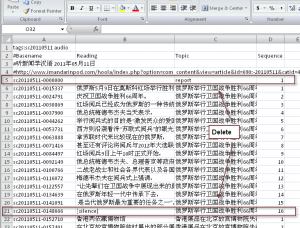
Using a text editor, look at the Anki data file (defaulted to a .tab file extension) exported from Transcriber. There should be four columns in the data section, separated by tabs:
- file basename
- segment text
- section title
- line number within section
Delete any rows you don’t want to make cards for, such as silent segments or music interludes. You should also delete the corresponding audio clips, since they won’t be used.
If you need to do more complicated editing to the data file, a spreadsheet program works great.
Step 6
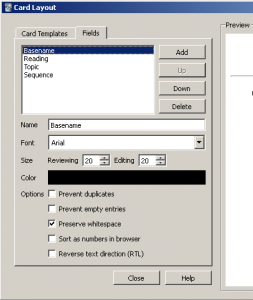
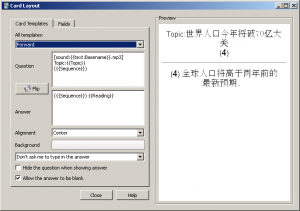
There are a lot of ways to configure a deck in Anki, so I will just present the basics. If you are using this data as starter material for a new deck, first create a blank deck. Next, edit the model, the card layout of the forward template, and add four fields. Instead of the default Front and Back, create fields for Basename, Reading, Topic, and Sequence (or other names of your choosing).
For the card template itself, the following is an example:
Question:
[sound:{{text:Basename}}.mp3]
Topic:{{Topic}}
({{Sequence}})
Answer:
({{Sequence}}) {{Reading}}
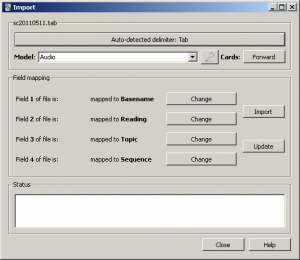
Choose File->Import to start importing the .tab data file. The import dialog should auto-detect a tab delimiter. If you set up your four fields as above, the field mapping will automatically be set to the correct import order: 1=Basename, 2=Reading, 3=Topic, and 4=Sequence. If the order is wrong, change the mapping as needed. After the mapping is set, click the Import button to load the data. As part of the import, each card will include tags for “audio” and for the original episode name.
